
Jet skis can get extremely dirty when they are being used. This may seem bizarre considering they are in the water. Have you ever actually looked at the water you are trolling around in? Often, you cannot even see through the water because of the dirt that has been stirred up.
The best way to clean a jet ski is with proper tools and chemicals. Using these will cut your time in half and lower the amount of elbow grease you will need to use. After cleaning, use a protectant such as a wax to prolong your hard work.
As a jet ski owner, you need to be aware that although the jet ski may appear to be clean, it most likely is not and you should make a concerted effort to clean it after each use to keep the jet ski looking new for as long as possible.
How do you best clean a jet ski?
Cleaning a jet ski does not have to take hours, but it does need to be a part of your routine. To clean a jet ski, you will need:
- Bucket
- Sponge and/or soft cloth
- Cleaning products
- A hose
- A scrub brushes
- Wax and protectant
- Anti – Corrosive Spray (saltwater riding only)
By taking the time to thoroughly clean and protect your jet ski, you will likely be adding years to the life of your machine.
Clean the Jet Ski
Cleaning a jet ski does not involve much, but you do need to make a concerted effort to do a thorough cleaning with the proper materials. Just like cleaning a car, you want to make sure the products you use are conducive to the body of the jet ski. If you use products that are too abrasive, you run the risk of damage.
Cleaning Products: While a clear water wash can help eliminate exterior dirt quickly, it does not adequately clean the body of your jet ski. To maintain the cleanliness of the machine you need to take time to use the appropriate cleaning products. Most are a gentle detergent that gets added to water and gently wiped over the machine. Here are some products that will safely clean your jet ski.
Most of the above options contain a cleaning solution as well as a wax component so there is no need to go through multiple steps to clean your jet ski. When choosing a cleaning product, it is important that you use a cleaner that is formulated for either fresh or saltwater.
Wax and Protectant: If you prefer to use multiple steps when cleaning your jet ski, the cleaning and wax formulation may not be the right choice for you. If you prefer a separate wax option, here are some popular options.
Sponges and Cloths: When it comes to cleaning your jet ski, you need to use proper cleaning cloths, so you do not damage the paint on your machine. You can use any soft cotton cloth, or you can purchase cleaning cloths or mitts that are made specifically for exterior cleaning.

The most important thing to look for when purchasing a cloth or mitt for cleaning is that it is scratch-free.
Scrub Brush: There will be times that you cannot fully clean the jet ski with a cloth or mitt and you will need to use something that is a bit more abrasive, but not abrasive enough to do damage to the paint on your jet ski. The best tool to use is a scrub brush that is specifically made to remove dirt and grime without damaging the paint. Here are a few great scrub brushes to choose from.
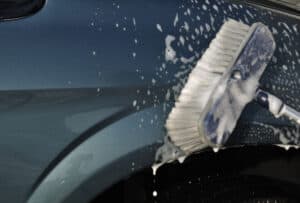
Most scrub brushes that you find also come with a long handle because they can be used on boats, which require a longer reach. There are also brush models that allow you to hook a hose to the handle, which provides a flow of water when needed during the washing process.
Bucket: You can purchase any standard bucket to place the water and detergent of your choice into. You will likely want a bucket that is large enough to fit both a brush head as well as several cloths into comfortably. Buckets can be purchased at any big-box retailer like Walmart, Lowes, Home Depot, Target, or even online.
When choosing a bucket, you want to make sure it is durable and corrosion-resistant because there may be a reaction between some cleaners and the plastic the bucket is made of. There is also an option for an insert that you place in the bottom of the bucket that allows sediment and debris to settle below the water. This helps ensure you are using clean water to wash the jet ski.
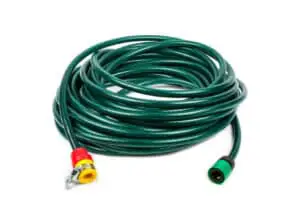
Hose: If you are planning to do a thorough wash of your jet ski, you will want to invest in a quality hose. You do not have to spend a ton of money to get a hose that will be both useful and durable. You can go to any hardware or department store to purchase a quality hose. There are also many options online that may be appealing to you as well.
Once you have gathered all the necessary supplies, you are ready to begin the ultimate task of washing your jet ski. When you jet ski, you need to make sure you devote enough time to do the job well. This is not a situation where you are going to spray the machine off and move on to something else. You are going to clean the machine from top to bottom and add a protectant as well, this is all part of jet ski maintenance.
Anti-Corrosive Spray: Riding your jetski in saltwater can take a toll on the machine, specifically the engine and wiring. Because of this, it is important that you use an anti-corrosive spray to protect those parts of your jet ski.
If you do not ride your jet ski in saltwater, you will not need to bother with corrosion spray because freshwater does not have the same negative impact on the engine and wiring. When purchasing corrosion spray be sure to purchase a marine grade or quality spray. Not only will this ensure adequate protection, but it will eliminate the risk of damaging your machine.
Cleaning the Jet Ski
This is the beginning of a lengthy yet simple process. To adequately clean your jet ski, you will need to follow specific steps to ensure you are fully cleaning the machine and not causing damage to any of the components of the machine.
- Rinse the machine with clean water
- Prepare detergent
- Coat the machine in the water and detergent mixture
- Wipe clean
- Rinse off
- Clean the Seat
- Dry the machine
- Apply seat protector
- Apply wax
Step 1: Rinse the Jet Ski
Before you begin covering the jet ski with water and detergent, you need to rinse the machine first. There is likely an immense amount of buildup coating the machine that needs to be removed before scrubbing. When completing the initial rinse of the machine, spend extra time in the crevices of the machine, including the footwells.
The footwells are a breeding ground for dirt and grime because of the different grooves on the treads. Make sure you thoroughly spray these areas off and let the water sit if needed. This will make the process of washing the machine much easier and a bit less time-consuming.
Step 2: Prepare the Detergent Mixture
Whenever you use any cleaning product on the jet ski, you will likely need to mix it with water to ensure the effectiveness of the cleaner. Typically, you mix equal parts of water and detergent unless the label indicates a different procedure.
It is important that the mixture is prepared in a corrosion-resistant bucket. This will eliminate the risk of the detergent reacting adversely to the plastic in the bucket. If at any point you notice a foul chemical smell or other indicators of a reaction, stop immediately and empty the bucket out. There is a chance the bucket is reacting to the cleaner. While this is unlikely to happen, it is possible, so you need to be aware.
Step 3: Wash the Jet Ski
Once you have the detergent mixture ready, you can begin to wash your jet ski. To effectively coat the machine, you will need to use a soft cloth that has been soaked in the cleaning solution. During this step, you want to gently coat the machine with water. If there are rough dirt particles or sand attached to the machine, you could cause scratches if you are not careful.
Most detergents will recommend that you allow them to sit for a few minutes prior to rinsing. If this is the case with your cleaning solution, allow it to sit and then gently rinse it off. If you notice there is still dirt and grime attached to the machine, you may need to enlist the help of a marine brush.
A marine or car washing brush is specifically made to be gentle on paint, so you do not run the risk of scratches when using it. Even so, you need to use caution because you could pick up debris that can scratch the paint surface. You will use the detergent and brush to repeat a wash job to hopefully eliminate the pesky dirt and debris that is staying behind.
Step 4: Wipe Clean
After you have successfully eliminated the excess dirt and debris, you are ready to wipe the jet ski clean. To do this, you will use a soft cloth or mitt that has been soaked in detergent water. Gently wipe down the machine, top to bottom. At this point, you should notice a nearly spotless jet ski.
Step 5: Rinse
After a final wipe down with the detergent and water mixture, you are ready to complete the final rinse. Using the hose and a gentle stream of water, you will rinse the jet ski from top to bottom. By beginning at the top, you allow all the dirt to be rinsed off as you move down the machine.
Step 6: Clean the Seat
Another important component of the jet ski that tends to get quite dirty is the seat. You can clean the seat with the detergent mixture you use on the body of the jet ski, but you will also likely need to use a more specific detergent to get the job done.
Remember the vinyl on the seat is not as durable as the body of the jet ski so you need to use care when scrubbing the dirt and debris away. It is likely that you can use mild detergent and water, but in the event of an extremely dirty seat, you may need to use a specific mildew cleaner.
Although each of these cleaners will likely work flawlessly to clean your seat, you need to check in an inconspicuous area first. This helps eliminate the risk of discoloration.
It is also important that you not use silicone-based cleaners on the seat, as this will harm the integrity of the vinyl. The effect will not be immediately noticeable, however over time you may notice cracks forming on the vinyl.
Step 7: Dry the Jet Ski
After you have completed the process of washing your jet ski, the next most important step is to fully dry the machine. While this may seem like a step that can be skipped, it is not recommended. Not only does drying the machine with a soft cloth help eliminate water spots, but it also gives the machine a nice shiny finished look.
Step 8: Apply Seat Protectant
Once the jet ski is clean and completely dry, it is a good idea to apply a layer of protectant to the seat. Vinyl, unlike the rest of the machine, begins to show wear over time. To help minimize the amount of wear on the seat, special care is needed. Here are some protectants you can try.
There are many products on the market to clean vinyl, however not all products are suitable for the vinyl on a jet ski seat.
Dangerous Products

When you are preparing to clean the seat, you need to stay away from products that contain any of these ingredients.
- Silicone
- Acetone
- 409 cleaners
Silicone: Silicone will damage the vinyl on a jet ski seat by pulling out the components of the seat that make the vinyl pliable. When this happens, the seat will become brittle and it will crack easily.
Acetone: Acetone is a very harsh chemical that can easily destroy the vinyl on a jet ski seat by softening the material.
409 Cleaner: You may see claims that 409 will clean vinyl. While this is true, it will also damage the vinyl seat.
If you use these products and they damage your jet ski seat, there is a good chance that the seat will be rendered irreparable and you will need to replace the seat of the jet ski.
How to Apply Protectant
Applying the protectant to your jet ski seat is easy to do, all you need is a soft cloth. Once the seat is completely cleaned and dry, you will either spray or wipe a thin layer of protectant on the seat. Some products may require more than one coat to offer full protection. If you are unsure, check the directions provided on the product.
Step 9: Apply Wax
If you have chosen a cleaning product that does not contain a wax coat finish, you will need to use a separate wax product. This will give your jet ski a brand-new look as well as protect the machine from the water when you are using it. Here is our guide to waxing a jet ski as well as our favorite waxes.
Most wax products are in a liquid form and come in either a spray bottle or bottle you will pour the product from. When choosing the wax for your jet ski, you need to make sure it is marine-grade wax. While regular car wax may do the job, it will likely not be as lasting as marine grade wax, which is formulated for marine equipment.
Once you have applied the wax, you will need to use a soft cloth to shine the machine. This final step is key to making sure your jet ski looks like it is tip-top shape. If you neglect the final shining or polishing step, your machine may appear to be dull.
How to Prolong the Cleanliness of My Jet Ski
After you spend an afternoon cleaning your jet ski to perfection, it may be difficult to think about taking it out on the water only to muck it up again. At the very least you may be wondering how to keep the jet ski as clean as possible for a long period of time.
Keeping your jet ski clean does not have to be a time-consuming process, however, it will take a bit of planning and time. This ritual of cleaning after each use will save you time when you prepare to do a complete wash and wax of your machine.
It is recommended that you do the following things after every ride you take.
- Flush the engine with clean water to remove any debris
- Spray the machine with clean water from top to bottom
- Clean the seat and footwells with clean water
- Dry the machine off
While these are not time-consuming steps to take, they will likely prolong the life of your jet ski and they will also make a deep clean less time-consuming.
Can I Use a Pressure Washer?
After reading all of the steps to wash a jet ski and the focus on thoroughly cleaning to get dirt and debris out of the crevices of the machine, you may be thinking it would be much more efficient to use a pressure washer. It is true that pressure washers can save time and elbow grease, but you need to be overly cautious when using them to clean a jet ski.
Remember, pressure washers can be dangerous depending on the pressure setting you are using. If you spray your jet ski with too high of a pressure setting you could damage the machine.
When we use a pressure washer, we use the 40 degree tip and never get too close. Try not to use a more aggressive tip than that as you can start to tear off graphics.
You can choose to use a pressure washer on a gentle setting to clean the body of your jet ski, but it is recommended that you NOT use a pressure washer on the engine of the jet ski, as it will cause significant damage (Source: Jet Drift)
Should I Cover the Jet Ski?
Once your jet ski is sparkling clean and you prepare to store it for your next ride, you may wish to cover the jet ski. The cover will protect the cleanliness of the jet ski, but it will also protect the machine from unnecessary UV rays if it is stored outside. Here are some covers you may wish to check out.
- Budge Jet Ski Cover Fits Jet Skis 121″ to 135″ Long, Blue
- Super Heavy-Duty Jet SKI Cover
- Black TOP of The LINE Jet SKI Cover
- Weatherproof Jet Ski Covers
When choosing a cover, you will need to make sure it is the correct fit for your specific machine. Each brand of machine has its own specific cover size. You can find this information in your owner’s manual or by simply searching for covers labeled with your brand and dimension.
Final Thoughts
As you can see, cleaning a jet ski is a process that includes several steps, however, with the proper materials and a little bit of time, you can maintain both the life and appearance of your machine. The most important thing to remember is to use the correct products and to follow the proper steps.
