Owning a jet ski is great fun, but it can also come with some headaches as well. One common problem jet ski owners experience is overheating. I know you can picture it well. You are buzzing around the lake having a great time, when all the sudden the engine cuts off and won’t restart. In that moment you felt frustration because an exciting day was suddenly being ruined by unexpected mechanical errors.
What causes a jet ski to overheat? There are many things that can cause a jet ski to overheat. The good news is that most of the causes can be remedied rather easily and with little expense. When your jet ski is overheating, it may be from one of the following things; interrupted circulation of water in the impeller system, running the jet ski out of water, bad gasket, clogged or blocked outlet holes, leaking cooling lines or a damaged impeller system.
Through the article you will learn how to figure out why your jet ski may be overheating as well as things you can do to fix the problem at home, before you turn to a certified mechanic. Please remember if you attempt the at home fixes and they don’t resolve the problem, it is best to go to a licensed repair person, so you don’t cause further damage to the jet ski.
What Causes a Jet Ski to Overheat?
There are multiple reasons a jet ski can overheat when you are using it. Sometimes the cause is an easy fix while other times it can be a bit more complicated and mechanical related. Follow along through the steps to determine if your wave runner needs an easy fix or more in depth work. Please remember this may not be an exclusive list and if you attempt problem solving with out resolve, it may be best to reach out to a certified jet ski repair person.
1. Interrupted Circulation of Water in the Impeller System
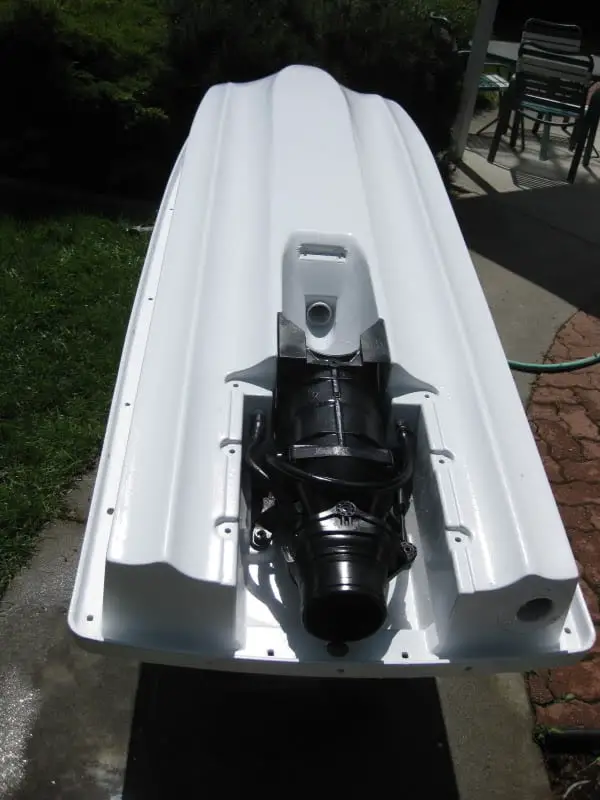
First, it is important to understand what an impeller is and what purpose it serves. An impeller is a small propeller that is connected to the pump. When the water goes through the pump it is pushed out of the back of the jet ski with force to propel the ski. In addition to propelling the jet ski, the force of the water coming out of the jet ski is what helps cool the engine and other components. If this part does not receive the adequate amount of water, it will not be able to work properly.
When the impeller is not working correctly you may notice a lack of power with the jet ski. You will also notice water is not flowing consistently from the back of the jet ski, which deteriorates the power of the, chances are the impeller or water inlet valve is clogged and you will need to fix it.
How to Fix it: When unclogging an impeller, you need to use extra caution, so you don’t damage the parts around the impeller or cut yourself on the sharp blades. If you notice seaweed or other plant matter hanging from the intake, you need to carefully remove the plants to free up the pathway for water to enter the impeller. The key word to this step is carefully. Trust me, I know it will be tempting to rip the obstruction out as soon as you see it, but don’t do that!
If the object is lodged within the impeller such as a rope or larger stick you cannot remove by hand, you may need to remove the intake grate of the impeller to remove the object. When doing this, you need to be aware of the seal around the screws for the cover. If you don’t properly seal these areas, water will leak into the impeller system which could cause further damage and less performance. When you remove the cover, you can also use this as an opportunity to check the condition of the seal. If you notice any damage or wear it would be a good time to replace the seal.
As with anything, you want to make sure you are being gentle when pulling any obstruction from the impeller. If you use unnecessary force, you will likely break a part of the equipment and the repair could be quite costly.
2. Running the Jet Ski Out of Water
You may be looking at this heading and thinking, who would run a jet ski out of water? Well, as strange as it seems, it happens quite frequently. Perhaps someone jumps on the jet ski as it is sitting on the trailer and they start it without even thinking. Maybe you are pulling up to the dock and are in low water. These are things that could impact the jet ski.
As you know, a jet ski needs to be in water to run properly. If you run the jet ski out of the water frequently you will eventually cause damage to the engine. At times, you may need to run the jet ski out of the water, however it is only recommended that you do this for a maximum of 15 seconds and you must have a water supply hooked to the jet ski. So, if you need to run the jet ski out of water, get your garden hose ready to push a constant flow of water through. If the engine stalls and alarms go off, you have run it out of the water too long.
How to Fix It: The engine of a jet ski is equipped with the safety feature of shutting off when the jet ski is not running in the water. Therefore, the remedy for this problem is to place the jet ski into an adequate amount of water.
However, if you have tried to run the jet ski out of the water for a prolonged period or multiple instances it is likely that you will cause damage to the engine of the jet ski. If this occurs, the jet ski will need to be taken to a certified jet ski repair shop. To learn more about running your jet ski out of water, consult our article here.
3. Bad Gasket
Maybe you have noticed water leaking onto your spark plug electrodes or the compression of your jet ski running on the low side. If you notice this, there is a chance you have a bad gasket. The job of the gasket is to maintain compression in the engine. If the gasket begins to go bad, it can cause leaking of both coolant and water. While the repair for this is quite simple, the results can be an overheating engine on your jet ski. The jet ski will continue to overheat until this problem is resolved.
How to Fix it: If you need to replace the gasket in your jet ski it is recommended that you purchase a gasket installation kit. While this isn’t a difficult task, it is something that requires attention and patience. If you aren’t certain about which gaskets to replace or how to go about replacing them, it would be best to consult with someone familiar with your jet ski.
There are typically multiple gaskets on a jet ski. To ensure you are truly fixing the problem it would be ideal to replace each of the gaskets. Not only does this remedy the problem, it is helpful to know the exact age of each of the gaskets if future problems occur.
4. Clogged or Blocked Outlet Holes

Perhaps you’ve noticed water is no longer coming out of the back of the jet ski and the engine is overheating, chances are you have a blockage that needs to be cleared out. If you have already checked the impeller and it is clear, it is likely one of the outlet holes is blocked. When preparing to clear out the blockage you need to use great care. If you try to force the clog out, you may cause damage. I have had a stick fit its way into my outlet hole and had to fish it out to not cause further damage.
How to Fix it: Typically, the best solution to clear a clogged or blocked outlet hole is to insert a smaller diameter drill bit and spin it by hand to release the blockage. Another method is hooking a garden hose to the outlet and running water through. If you attempt to do this several times and the blockage is not clearing, it is likely quite compacted. While it may be tempting to try a pressure washer or more forceful means of clearing the blockage, do not do this! Putting this much force on the outlet, may cause damage. If this is unsuccessful you may need to seek the support of a licensed repair person.
5. Leaking Coolant Lines
Another common cause of a Jet Ski overheating is leaking water cooling lines. Some jet skis have open cooling which uses lake water to cool the engine, and some newer jet skis have closed loop cooling. They are more like a car. Unfortunately, it is not always easy to determine if the coolant lines are leaking. If you have open loop cooling, the worst you will notice is some water in the hull, but you don’t know if that was from water splashing in or a leaking cooling line. Some indicators of leaking coolant are obvious while others are more obscure and difficult to detect. The first indicator of leaking coolant in a closed loop cooling jet ski is a low level in the reservoir.
You may also notice a puddle of coolant after your jet ski has been sitting on the trailer or in storage. This will be a much more obvious indicator of a problem that needs to be resolved.
How to Fix It: Before you can begin to fix a leaking coolant problem, you need to determine where exactly the coolant (closed loop) or leaking water (open loop) is coming from. It is very likely that it is not coming directly from the reservoir tank on your closed loop ski. You will notice there are tubes that come from the reservoir to the engine if you have a closed loop and the same tubes coming from the jet pump in an open loop cooling model. It is possible that one of the hoses is leaking either because it has a hole or is loose. To determine if the hose is leaking, it may be helpful to place a paper towel under the hose while the jet ski is being stored. If you notice coolant on the paper towel you have likely found your answer.
Another way to determine is to start the jet ski out of water on a water hose. You will be able to observe the engine running to see where the leak location is coming from.
To repair the hose, you may need to replace the hoses or just tighten the clamp. To make sure it isn’t just an issue of tightening the clamp, it would be advantageous to tighten the clamps and do the paper towel test. If the leak stops, you don’t need to do anything else. If there is a leak on the paper towel, you will likely need to replace the hoses and clamps.
Before you replace any hoses, make sure you drain the coolant tank first or plug it if you have one on your model. If you fail to drain the coolant tank or plug the line first, you will likely end up with a mess. Once the coolant tank is drained, you are ready to replace the hoses. Check your owner’s manual to be sure the correct hose size is being used in the replacement. They will be sized exactly so there won’t be any need to cut them. After they are replaced, fill the tank with coolant and once again check for leaks.
If you have a open loop cooling model, you just need to replace or tighten the leaky hoses.
6. Damaged Impeller System
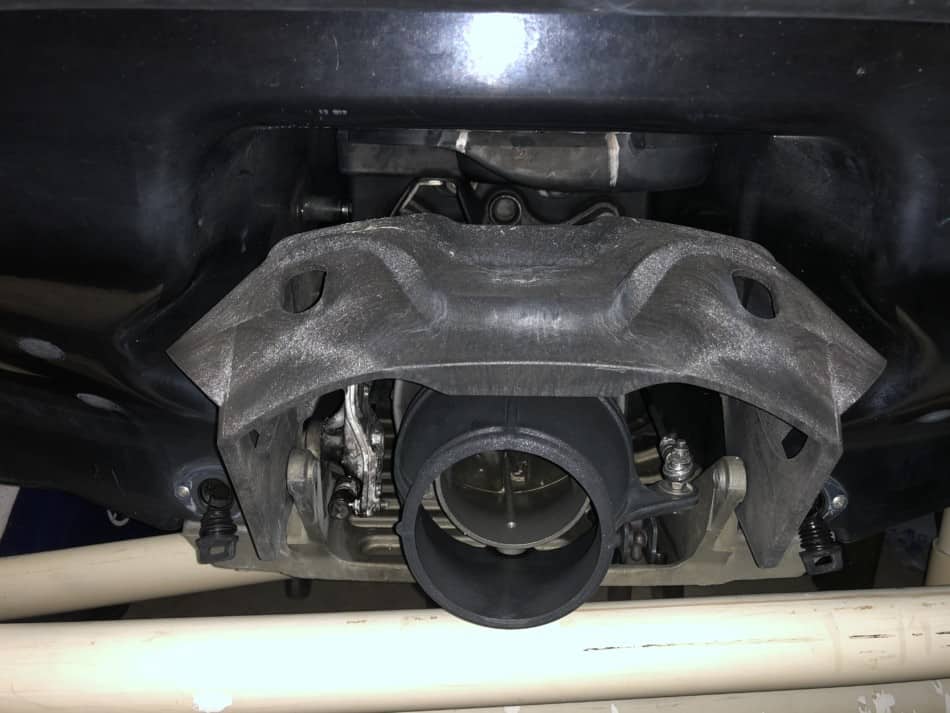
The impeller system is critical for the operation of the jet ski. If the impeller system is damaged the jet ski will overheat and throw a check engine light and turn off. A damaged impeller system can occur when you run the jet ski into shallow water, or it can occur from a significant blockage. During either of these events there is a good chance the wear ring became damaged and needs to be replaced.
What is a wear ring?
A wear ring is thick plastic that wraps around the impeller and forms a seal to allow water to forcefully push through. When the wear ring is damaged, it will not provide a proper seal, thus impacting the amount of pressure that is available to push the water through the impeller and up to cool your jet ski.
How to Fix it: Accessing the wear ring can be a bit complicated if you aren’t familiar with the mechanical parts of the jet ski. You will need to remove the ride plate, intake grate as well as the impeller housing to access the wear ring. During this process, you may also need to disconnect the steering cable and any hoses that may be connected to the housing. Once you have access to the impeller housing and can safely remove it from the jet ski, you will need to remove the wear ring. There are two methods you can use to do this.
Cut the wear ring out: Be very cautious when cutting the wear ring. This is a quick way to remove the ring, but it also comes with the risk of potentially damaging the housing of the impeller. If you choose to cut the wear ring, be cautious and very controlled with the cutting tool you choose to use.
Freeze the Housing: While this may sound like a bizarre method of removing a wear ring, it is much less risky than using a tool to cut the ring. If you do not feel comfortable using sharp tools around the impeller housing, this method would likely be a better option.
Once you have removed the housing, place it into the freezer until the wear ring has shrunk enough to easily remove. The cold temperature will allow the ring to contract, making it easier to remove.
Once you have successfully removed the wear ring, you are ready to replace it with a new part. Before replacing the wear ring, be certain you have the correct part. You can check the owner’s manual or ask a jet ski retailer for help.
Helpful Tips
As you can see, there are many different potential causes of your jet ski overheating. While it won’t always be simple to determine the exact cause, with a little bit of patience and investigating you should be able to have your jet ski up and running in no time. Although the repairs can seem quite simple there are some things you need to remember.
Always work from under the jet ski: It may be extremely tempting to flip the jet ski upside down for easier access, but this could harm your engine mounts, as they are not manufactured to hold a significant amount of weight. Even flipping for a short time could cause damage.
Because it is inevitable you may need to do work on your jet ski, it would be advantageous to purchase a shop cart that can support the weight of your jet ski.
Take pictures as you work: If you are planning to do a repair that involves removing wires and hoses, take a picture of the connections before you begin disassembly. This will make it much easier to put your machine back together and will help eliminate the risk of possibly forgetting to attach an important wire or cable.
Use manuals/videos/ experts: Clearly you want to repair your machine in the best possible way, so this is not a time to pretend to know everything there is to know about jet skis. Take advantage of the manuals as well as videos and other experts that have made similar repairs.
Mark items with blue tape: If you are disconnecting wires, bolts, or hoses, you can put a piece of tape on each side and number them so you remember the order as well as what goes where when it comes time to reinstall.
It may seem inconvenient to be tied to a manual, video or another person during the process, but it will help lessen the risk of making a costly error during the repair.
Final Thoughts
Jet skis are amazing recreational vehicles that can be a lot of fun to ride, however like any machine there is always a risk of malfunctioning occurring, such as overheating. The good news is that most simple repairs can be made without taking your jet ski into a garage, if you take your time and really determine what the cause is as well as a proper repair. If at any point, you don’t feel comfortable making a repair or you can’t determine what is wrong with the jet ski, ask for help. I hope you have found a potential answer to your overheating jet ski!
